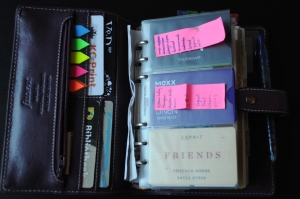
I’ve been wanting to share my current set up experiments but I thought it best to first show what I did last year. To show the journey of where I’ve been, what I’ve done, so that you can understand where I’m going. When getting into the Filofax world, I loved watching everyone’s set up videos and blogs. I still do! I get a lot of great ideas and inspiration from all you planner fans out there :). However, what I didn’t see so much of, was what people did with their old pages. Do you toss them out? Scan them? Keep them? How? So this post will be in two parts. This one will be about my set ups of 2014. And the second part will be the continuation of my 2014 set up, and my solution to archiving old pages.
Mid 2014 was the time that I got my first real filofax (well, I got two or three at the same time :p). The very first one I used though, was a blue compact zipped Pennybridge…or was it the compact teal Calypso?. In any case, it was a compact size. I have since then obtained more Filofaxes but the set up was always, more or less, the same.
 By the time I decided I wanted to start this blog, I was in a purple Malden in personal size. The front pockets was used to store my most used cards which are my student, library, and gym cards. I stored some coins in the zip pouch, and the page flags. The credit card inserts housed my other store reward cards and also acted as a dashboard.
The zip pouch is where I stored any discount coupons I had. I got this zip pouch from Hema, a Dutch store, with other personal sized inserts. The pen is a Pilot gel 07 pen. This one is the B2P (Bottle to Pen) one. I like it because it writes smoothly, and it’s made from recycled water bottles! 🙂 As you may see, the pen doesn’t fit in the pen loop of the Malden, so I just hang it from the notebook pocket place.

Next comes another dashboard made from some handmade paper I bought from a big hobby shop in Holland called Pipoos. This was where I kept the unused sticky notes.
And now the calendar and planning part begins! Next to the year Filofax year overview, I printed out my school’s year calendar which indicates the times that the school is open and closed. All colour coded. I am always needing to refer to that to know when the next holidays are coming, or if the school is going to be closed so I can’t rehearse or something like that.
The first divider is for the Monthly view. When I first set up the monthly section I didn’t have any coloured dot stickers so I used my stabilo pens to make colour coded dot legend.
I only started using a monthly view from August after seeing so many youtube videos. I thought that it may be useful for me to have a month overview for tracking extra work days, birthdays, forward planning with rehearsals, and especially to avoid double booking myself. With the dots I can quickly see if I’m available on that day if someone calls me for a gig, instead of flipping through the weekly pages.
I printed the weekly pages from Scattered Squirrel’s website. It was a free insert that she provided, and I liked how colourful and cheery it was. It’s supposed to be a month on two page layout, but I made a mistake in the cutting and punching of the holes, so I glued the pages together to make a month on a page folded in. This mistake turned out to be really great for me because I was then able to have a space to write my monthly tasks and goals. To find the month quickly, I used the page flags (pictured at the beginning) to add monthly tabs.
At the back I used the notebook pocket to house the coloured dot stickers that I eventually got! The plastic sleeve is from the same Hema package that I also got the clear zip pocket insert. Excuse the last picture. I believe something went wrong whilst transferring the image from my camera to the computer and part of the image now is gone :/.
Well, that’s it for today. Hope you enjoyed seeing my set up so far. Join me next time with part two where I will show my weekly pages, how I incorporated a spiraldex, and finally how I archived it all.
‘Till then,
P.


The insides of your planner (just the overall look) reminds me of mine.
Kristy
LikeLiked by 1 person
🙂 Cool! Would love to see your full set up. I have just uploaded part two of this post post with the rest of the set up and how I archived the pages. Do you keep your old pages or toss them out?
LikeLike